Staying Motivated on A Fitness Journey / Glutey Wear Leggings Review

Fitness is a big part of my life, to me, it all goes hand in hand with my love for make up artistry and my obsession for skincare. When you feel confident, it immensely impacts the way you carry your self in day to day life. 

When asked for advice from friends and followers on how to stay motivated to keep up with a fitness journey (or any new venture for that matter) my answer is always the same, stop looking at whatever it is as a chore & more like something that simply needs to be part of your day. 


Not A Chore - A (small) Part Of Your Day.

You wouldn't think twice about allowing time to brush your teeth or take a shower in the morning as you see these actions as necessary or of high value to your day, so why would you look at your fitness journey in a different way?  & not to mention the sense of satisfaction & accomplishment you get from not only seeing but feeling the results of your hard work over time. 


Post Gym 'Reward'

As I also suffer from acute insomnia I like to go to the gym in the evenings and 'reward' my self after a workout with a nice relaxing session in the sauna/jacuzzi. This really helps me relax & unwind after a particularly long day & as a result, get a better quality sleep. If a gym with nice facilities & extras is out of your price range you can always have a nice bubble bath to soothe your muscles. I personally don't mind investing in a slightly more expensive gym as that in itself helps motivate me to get my foot through the door as I'm entering a nice atmosphere.
I like to go to the gymbox branch of gyms, the atmosphere is energetic, they have resident DJ's in the evenings, the gyms are kept quite dark so you don't feel exposed, there are separate facilities for men and women, fantastic creative classes that are switched up regularly (including things such as boxing, pole dancing, aerial yoga & more)

Get A Fitness Tracker

Purchasing my Fitbit was another big motivator for me, having a visible tracking device for your steps/calories/active minutes was really helpful and addictive to keep up with. You can set your own targets and build them up as you get fitter, so start with figures that are realistic and manageable to you, they also have weekly challenges that you can take part in if you're the competitive type! The Fitbit app is really clearly set out & easy to use. Pictured below is my Fitbit Versa. I love the sleek design and long battery life - this alongside the Fitbit app layout were my main deciding factors for getting this watch over an apple watch.

Another thing that I find motivates me is quite simply having some gorgeous gym clothes, of course, you can workout in whatever you want, but I've always appreciated the value that wearing a flattering outfit brings to any situation. Not all gym wear is created the same, you can find brands that specialise in compressing certain areas of the body for added support (e.g stomach/ thighs) 

Simply feeling comfortable working out & not having to worry about any 'problem areas' jiggling about & making you feel self-conscious can affect whether you choose to go through with a workout in the first place for some.


Glutey Wear Leggings

I recently came across a brand called Glutey wear via a friend of mine Amy Quine (check her out, she is an amazing personal trainer and fitness model, her page inspires me every day)


She wears this particular brand of leggings quite a bit and I loved how much it seemed to flatter the shape of a woman's body. I always struggle with sportswear and leggings in general not fitting me properly around the waist.
If it fits my waist it's far too tight elsewhere and flattens my bum ..and a girl's not out here never missing a leg day to have my gains flattened by poorly fitting leggings! haha


These leggings have gorgeous ruching detail which really compliments the shape of your bum and helps it look nice & peachy. They also feature a thick and supportive high waistband which I love, supporting your stomach and at the same time creating a flattering shape for your hips. I personally love the shape high waisted leggings give & if you tend to carry weight around the top of your hips or one of your 'problem areas' are love handles, this is a great option for smoothing this area out.


Another thing I struggle with is the waistband of sports leggings. If it's not the gaping hole at the back its the fact that the waistband loosens as you wear them and I find myself having to hoist my leggings back up, which is both unflattering and impractical. I was so pleased that these not only stayed in place but felt incredibly comfortable and unrestrictive whilst doing so.


I went ahead with getting a high waisted black pair and found myself wearing them even on days when not working out.

I particularly loved them for travelling in recently, I threw on a cosy jumper & as the material is nice and opaque with minimal branding, it simply looked like I was wearing high waisted fashion leggings. I was then able to switch out my jumper for a sports top later on in the evening for my workout, so I loved the versatility of being able to wear these in a few different ways!

You can check out their page here. Their Instagram features images of fit and strong women of all shapes, which is both amazing & inspiring to see. I can't wait to see how they expand their collection!

As always, thanks so much for stopping by, 


Creating Bouncy Curls With Staighteners


Now, I love big bouncy hair as much as the next girl & if like me you struggle to stop your curls from dropping by lunchtime then hopefully this post will help!

I recently got my hands on the wide iron straightener by Cloud 9 and have really enjoyed creating my signature everyday look with them as I've found my curls last quite a lot longer than when I use a classic tong, which is what I'm used to doing. 


I've been using it for a few weeks now and highly recommend it without hesitation! It literally heats up within seconds, a significant improvement to my previous curler. It glides through the hair & I love that it came with a heat protectant guard and case. I also read in the manual that it smartly switches itself off when not in use for 30 minutes - that will save you those 'did I turn everything off-my house is going to burn down' heart attacks! This straightener definitely exceeded all expectations.

Quick pointers:
Why the wide iron and not the original size?
I prefer a bigger, looser curl that either looks like a curly blow dry or relaxed beach waves. The wider iron creates a larger ringlet that works beautifully on mid-long length hair. You may want to pick up the smaller size if you have shorter hair unless you want a really relaxed look.

Why would I want to buy a straightener to create curls? 
If you don't mind the learning curve, I think it's the logical choice as it eliminates the need for 2 tools. 
You can create quite a few looks with a straightener if you're willing to learn to use it to its fullest potential, everything from waves to curls and of course straight hair or slightly curled ends to mimic the effect of a sleek blow dry. I've also found that you apply less heat to the hair as your not clamping it into a tong & holding it for several sections but rather gliding a straightener through for less time.

Prep 
The products you wash your hair with will definitely affect how your style lasts. My hairdressers over the years have recommended shampoo's with no silicone or coating agents as this weighs the hair down, increasing the chance of the style falling flat. You want to look for shampoo's with a slightly lighter texture, they'll usually be marketed as volumising or for oilier hair types. I've also found that organic SLS free products are very lightweight and hold styles well, a shampoo that I have enjoyed using is the Aloe & Mint shampoo and conditioner by Less is more, it has a refreshing scent and the conditioner nourishes without being too heavy.
Styling Products
Mousses work very well at adding body to the hair and helping styles last but I find they're often forgotten about. I concentrate the application of products like this to the roots as my hair tends to lose volume there first due to my oily skin type, I then apply a small amount to the midsection and ends
There is definitely a learning curve with mousses as some hair can take quite a bit of it whereas others cant - this is something you will have to discover for yourself. I personally apply a palm-sized dollop to my entire head.
 The product that I have enjoyed using at the moment is the Big Fat root boost mousse spray by Lee Stafford, the precision applicator nozzle makes it very easy to apply to the roots and it feels very refreshing on the scalp, It really helps with adding volume, without it, my hair looks so flat it's almost like its stuck to my head by the end of the day- not cute.
*Lee Stafford products are currently 3 for 2 in boots at the moment. (18/10/17)
My Tips:
Avoid any oils prior to heat styling - I don't know if it's just in my head but I feel like I'm frying my hair if I apply it before, I usually pop an oil on after heat styling to define the curls and nourish the ends.

Hair Drying
I've also found the way in which you dry your hair also affects its ability to hold style. 
First, make sure your hair is thoroughly combed through - I've loved using Lee Stafford's tangle terminator brush seen in the video ( launches 30th October in boots) as the moving brush plates don't pull or tug at the hair, getting knots out quickly and gently.
Blast Dry - The most time-efficient option: It can make your hair look fluffy/frizzy if you don't heat style it after. If going via this route tip your head over to get volume at the roots then make sure you dry your hair with the nozzle pointed downwards as this helps smooth the hair cuticle down, reducing frizz.
If you have a bit more time section off your hair and dry it with a round brush concentrating on building lift at the roots but be sure not to spend too long smoothing it through the midsection as this essentially will have your hair 'setting' into a straighter style.
After I'm done with drying, it's at this point that I spritz a curl-specific heat protectant onto my hair. The one that I like to use is the Loreal Studio Pro Heat Hot & Curl Spray I usually buy this on fragrance direct, or, I just noticed its on sale in boots at the moment (18/10/17) My old favourite was the Waves heat protect spray by Elnette. However, I haven't been able to get my hands on that for ages so I can only assume it's been discontinued, which is a shame because it was fantastic.

Show me how to do it already!

Alright, alright, I'm getting to it! To write how to do this would have left you more confused than informed so here is a very quick video that I uploaded on my Instagram of the technique that I use for curling hair. Note this is for curls that fall flowing away from the face, you will have to the wrap the hair in the opposite direction per side for a different style. Alternatively, you can alternate if you want more texture, however, I prefer when my curls flow in the same direction.


I love to finish up with a spritz of Lee Stafford's Hold Tight Strong Hold Hairspray, I've used it in the middle of the day to help refresh my curls and it did an excellent job at holding my style without feeling crispy.

& that's all folks! I hope you found this post informative and enjoyed the video. let me know if any of these tips worked for you and feel free to comment any suggestions for tutorials that you would like to see in the future.


Fashion Week Inspired Look

I recently shared a few videos about a Fragrance Direct haul and with London fashion week just having passed us by, I wanted to create a look inspired by some of the makeup we saw on the runway.


From bold and graphic to vibrant pops of colour & of course the signature glossy supermodel skin!


Vogue London Fashion Week 2017 Images

For my look, I wanted to create something with a strong lean towards the graphic liners we saw but with a slightly more wearable feel.


There were strong feline focus' to the eyes, with some looks being imperfectly smudged out to give that lived in feel. 
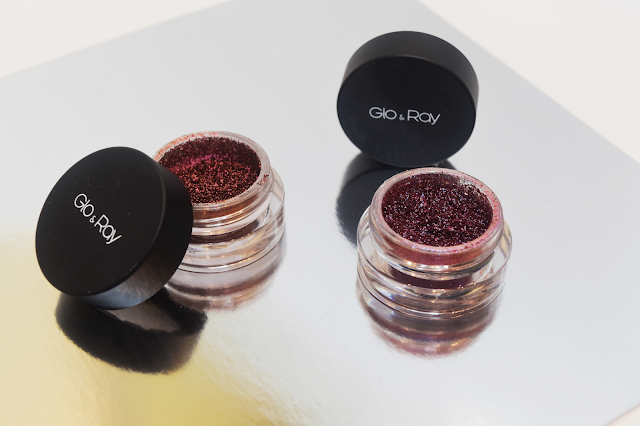
I decided to go with a classic winged liner pulled in at the inner corners to extend the look of the eye and smudge the top into the gorgeous two-dimensional pigment by Glo & Ray called More Electric £12.90 I also picked up the shade 'Goldmaniac' which I used to create a lip art that you'll soon see later on in this post. This pigments are absolutely stunning and go on very smoothly, I just loved how they reflected under lighting, picking up all the different colours present.

Glo & Ray Pigment - More Electric, Glo & Ray Pigment - Goldmaniac

Now for the liners, we have the Maybelline Master Gel Liner in brown £2.50
I loved that this came with a precise liner brush and a sponge tip smudger..all for under £3, what more could you want?! 

Maybelline Lasting drama gel liner - Brown

I love starting with a brown as a 'liner base' then blending the black into it - concentrating your application of the black at the base of the liner shape. This gives a softer more earthy feel to a smudged liner look and the transition is more forgiving on paler skin tones. 
For the main black liner, I found a gel formula coming in at just under £4 by Calvin Klein beauty - I couldn't believe that for that price it came with a full sized brush!

Calvin Klein Beauty

Now during the countless hours that you can spend on a site like this, I came across two brush sets that I thought would make fabulous all-around starter kits for all you makeup lovers. With brushes, I'm quite fussy and only go with brands that I'm familiar with, I jumped for joy when I found this brush set by Royal & Langnickel at half price for £8.95 - a brand that I trust and already have countless brushes from in my professional kit.

Royal & Langnickel Moda Beautiful Eyes brush set.

The brush labelled 'Smokey Eye' was perfect for diffusing the shape of the liner and getting that smudged effect.

Royal Contour brush set, Royal & Langnickel Moda Beautiful Eyes brush set.

After achieving your runway ready eyes the next step is getting that perfectly sculpted & glowing skin.
To achieve this you need a good set of dense buffing brushes to make sure that your foundation & contour is thoroughly blended in and looking flawless. I found this stunning set by Royal for only £6.99 - the set included a handy blending sponge too!

Royal contour brush set, L'oreal infallible sculpt, Nars frenzy dual intensity blusher.

For contouring, I love to use cream based products as they simply blend more seamlessly and are more forgiving on drier skin types or those who may have textured skin- where powder based products may go patchy. I found this kit by loreal called Infallible sculpt £4.99, which I have used and featured here on my blog previously. The cream has a lovely thin consistency so you will not struggle to blend it in - this also makes it easier to build up to the intensity of your preference.

For Blush and highlight these stunning dual intensity blushes by Nars £30, caught my eye, the shade Frenzy in particular, as it has a highlighter and blush in one conveniently sized product. 

To complete this look you want a striking lip colour - taking the feel from the Dolce & Gabbana look but going for a drastically deeper tone to be more in keeping with autumn lip colour trends. I decided upon the pure matte lipstick by Nars in the shade Volga £21. A lovely creamy formula with a handy shaped applicator that is more precise than the traditional lipstick bullet shape.

Nars Volga Lipstick

Then for fun, I also wanted to do an interesting lip art inspired by some of the graphic lips we saw on the runway, including love heart/petal detailing using the Glow & Ray pigment in 'Goldmaniac' mentioned previously, mixed into a clear gloss - I actually used the brush that came with the Maybelline liner to achieve this as it was very firm and perfect for achieving those crisp lines.


Lastly, I picked up a fragrance. I always like to switch up my perfume at this time of the year. I love Euphoria by Calvin Klein - Described as having dark exotic floral notes - this is perfect for those who, if like me, do not particularly enjoy sweet fruity scents, preferring something that's alluring & feminine but with a richer feel. 
This wears beautifully - at first spritz you're hit with the floral & fruity notes. Top notes include pomegranate & Japanese apple, heart notes reveal hints of lotus flower & black orchid then at the base, we have the notes that give this perfume its 'weight' including mahogany and Amber.
I picked up the 100ml Size for £39.95 saving £30 off the high street RRP.


& that's everything!

I hope you enjoyed the more creative direction of this post - I love referencing fashion week looks as they're always more out of the box and interesting to look at. We can all keep on trend with the looks you see by simply being inspired by them and challenging yourself to create more wearable versions or just having fun replicating them because that is what makeup is all about!


Thank you for taking the time to read this post. As always, if you need any further help with this look or just want some makeup advice feel free to contact me!


JLo Glow Inspired Makeup Look


Today's post will be a product breakdown of a popular look I uploaded onto my Instagram a little while ago.

Highlighted Skin

Glowing, radiant skin is something that most people, regardless of age, long for.
For this look, there was a heavy focus on creating a gorgeous bronze highlighted skin with a 'lit from within' feel. 
To create it I applied thin layers of a few different illuminating products, as you want different intensities of highlight on particular areas of the face.

Prep Step 
Prep the skin thoroughly with your favourite face wash - preferably exfoliate if there is any texture present & add a thin layer of your favourite lotion /cream. Let this sink in...have a coffee ;)

Get Lit
Now the fun begins, I like to prep the skin with an illuminating lotion (creams sit too heavily on my oily skin) product suggestions from high end, low end and everything in between include: 
Becca shimmering skin perfector, Charlotte Tilbury Wonderglow, L'oreal true match highlight, Rimmel Good to glow, Clarins flash balm

in whichever shade suits your skin tone best, I like to use Soho Glow or Piccadilly Glow

I love Golden glow - there is an alternative to this cream with a little bit of coverage to help warm up your complexion which is the L'oreal Glam Bronze GG cream which I found on the Fragrance Direct site for only £4.99 

I adore Opal

Charlotte Tilbury Wonderglow £38.50
Gorgeous skin in a bottle, dahling!

Lastly, if you prefer a product that gives you a little pick me up that doesn't rely on reflective pearl pigments or shimmers to give you a glow you could try cult product: Clarins Beauty Flash Balm £31

Ultimately, there are a plethora of choices to suit whatever your budget may be so I would recommend shopping around and swatching formulas to ultimately determine which you like the texture & finish of best.

Next, apply your foundation, my personal suggestion would be something with a thin consistency to allow the glow to show through from the liquid illuminator. I love the Invisiwear Foundation by EX1 Cosmetics £12.50. It has a gorgeous glowing finish that isn't too shiny, is medium coverage and sits comfortably on the skin.

Definition Is Key
When adding definition to a look like this I love to work with creams as they blend beautifully, give a softer finish & you can create that gorgeous warm halo around the perimeters of the face, that Jennifer is known for, without it sitting too heavily or being distinctly detectable


Tom Ford shade & illuminate, Lord & Berry contour palette,L'oreal infallible sculpt, Sleek cream contour palette, Benefit Hoola quickie contour stick

I love the convenience of the Benefit Quickie Hoola Stick £23.50

Sleek palettes offer a versatile range of shades with their cream contour palettes £10.99 (currently on sale in Superdrug for £8.99)

I found the L'oreal infallible sculpt palette at a steal for £4.99 on fragrance direct & whilst I was there also found a handy contour palette by lord & berry £25 that includes a blush as well as concealer and bronzer shades.

On the higher end side of things I adore the Tom Ford shade and illuminate palette £58, this cream is not full coverage so blends out beautifully and discreetly, making it first timer friendly- if it suits your budget.

To Set Is To Stay
For a look like this I like to only set the t-zone and under eye area, this helps keep the look as glowing as possible and retains the effect of all of that skin prep. I use a damp beauty blender sponge and work a small amount of powder into the skin with firm pressing motions.

If you wanted this to last all day you would need to set your entire face but please note this will obviously take the glowy effect down a notch. 
I love spraying a healthy amount of MAC Fix+ for the glow factor after powder. A setting spray will soften the flat look of powder & help it look more 'skin like'.

Dress to Impress
To 'dress up the face' as I like to say, use your favourite bronzer/blush.. or both! If doing both, try to choose a tone of blush that is in keeping with the feel of this look. So, depending on your skin tone, opt for peaches, apricots or oranges.


MAC Peaches, Sleek Life's a peach, Bourjois tomette, Nars Frenzy blush
MAC Peaches £19.50
A fresh uplifting shade that really adds life to your look.

Sleek Life's A Peach £4.99
Purse friendly & pigmented, a little goes a long way!

Bourjois Tomette £5.99
No Longer available but found at a steal of a price on Fragrance Direct, so grab now before it's gone forever. It has a Gorgeous creamy powder texture that has a slight shimmer.

Nars Frenzy £30
If you want to splurge, this is stunning. On one side a gorgeous warm blush, the other, a gleaming highlight. Use shades alone or mix together.

You're On My Glow'dar
For a look with serious glow factor, I like to layer different highlighting products. I have been loving Barry M's Liquid Chrome highlight drops recently, they are insanely pigmented and sit beautifully on the skin.With 6 shades to choose from, find the one most appropriate for your colouring. I personally use the shade Liquid Fortune

Now you could stop here, but if you're after that ethereal glow you can apply a powder highlight on top to intensify the effect. 

Some of my favourites include:
MAC Oh Darling, Sleek Cleopatra's Kiss, Benefit Dandelion twinkle, The Balm Mary Lou Manizer

MAC Extra Dimension Skinfinish Oh, Darling! £24.50
This cult favourite is sure to have you seen from a mile off - if you find this shade too gold have a look at their other shades, there are 7 in total.

Sleek Cleopatra's Kiss Palette £9.99
This palette is both stunning & versatile. Including both cream & powder highlighters.

Benefit Dandelion Twinkle £24.50
A soft, baked highlighter which goes on smoothly & sits beautifully on the skin giving it an angelic quality.

The Balm Mary-Lou Manizer £19.99
Another cult product, This highlighter is slightly less gold than MAC's Oh Darling, making it more suitable for paler skin tones. This is a personal favourite of mine.


 Highlighted Skin

All Eyes On You
For my eyes, I kept it simple as the real star of the show for this look was the skin. A palette with matte warm neutral tones will work best. 
Start with a mid-tone warm brown into the crease for soft definition and add a soft swipe of a shimmery nude/your highlighter onto your lids. I find that a slightly deeper tone works best as if you go too light your eyes will look washed out & small. Lashings of your favourite volume-building mascara to complete.
Huda Beauty rose gold palette, ELF Mad for matte palette 2, Urban Decay Naked Heat
I love Huda Beauty's Rose Gold Palette (£56) I get so much use out of it, for both natural day and glamorous evening looks.Grab it now before it's gone as apparently it's limited edition.

For those on a budget, ELF has you covered. The colours in the new Mad for matte palette 2 (£12.50) are bang on trend.

This release pretty much broke the internet. Urban Decay did it again with their Naked Heat Palette £39.50.Intensely pigmented & blendable, my new go-to.

& That's all folks! 
As always, I hope you enjoyed reading the post. Please do let me know if you try this look & feel free to ask any questions if you need help!

PS.
Fragrance Direct has an extra 10% off today only until 10 pm, so I've linked a few products to their site, they now stock some amazing high-end brands like Nars and Sisley Paris so make the most of this discount & stock up on those gems- use the code: FLASHTEN at the checkout..you're welcome ;

Spectra Carbon Peel At Premier Laser & Skin Clinic

After having such a great experience with my hydra facial at Premier Laser & Skin Clinic in Notting Hill, I went back to try a new treatment, highly recommended by the staff at the clinic.


The Spectra Carbon Peel is a laser-based facial that promises a broad range of benefits including:
  • Evening the Skin Tone
  • Improvement of pigmentation
  • Reduction of pore size
  • Helping to combat inflammation & redness
  • Controlling excess sebum production
  • Helping to restore damaged skin
As someone who has oily skin prone to blemishes & also suffers from pigmentation as a result of breakouts, this sounded like a fantastic fit for the needs of my skin.

What To Expect
To begin, protective eyewear will be popped on & after a thorough cleansing of the skin, a black photo enhancer lotion is applied; the practitioner explained that the laser targets the area in which this lotion is applied due to its colour.

A few passes of the laser will be performed, this heats up the pores & helps eliminate any active acne. The laser vaporizes the lotion and lightly ablates the top layer of dead skin. This process can be clearly seen in the video & is quite satisfying to watch! The practitioner repeats this process 3 times for optimal results.

What Does It Feel/Sound Like?
Expect to feel concentrated heat where the laser makes contact with your skin. It may feel uncomfortable at times but in my opinion, it never hurts.
Some of the equipment will be loud at certain points with beeping sounds. This isn't a relaxing massage based facial it is more time efficient and results focused!

How Long Does It Take? What Is The Downtime?
I was surprised at how quickly the facial was performed, I was in and out in approximately 45 minutes! & with minimal downtime, this would make the perfect pre occasion facial, no wonder it's a favourite amongst celebrities!

With my personal experience, for the rest of the day, I followed the practitioner's advice and did not wear makeup. I really wanted to just let my skin rest to really make the most of the treatment. I didn't experience much redness at all, I may have felt & looked a little bit flushed,  effects similar to that of a good workout session, so nothing that would make you feel self-conscious on the way home.

What Results Did You Experience?
 In the week following the facial, day by day, my skin was looking more even & upon close inspection in the mirror, I definitely noticed a big improvement in the appearance of the texture of my skin and the size of my pores. I always have realistic expectations when it comes to facials and never expect miracles, so whenever I see significant results it's always a welcome surprise.

Verdict?
I definitely see why this facial is so popular and would without a doubt return for another session as I believe the results were worth it! 
I am a huge fan of peels in general and do regular acid-based peels which can sometimes cause dryness, tightness & if at a particularly high concentration cause flakiness, which is obviously very inconvenient, so to have a treatment that gives the same if not better results without the downtime gets a big thumbs up from me!

If you are interested in experiencing this facial for yourself I highly recommend visiting Premier Laser Clinic's website to find your nearest located clinic & read up in detail about the procedure. If you are unsure whether you are suitable for this facial I would recommend booking in for a free consultation to speak to a trained professional and establish the best treatment plan for the needs of your skin- I've always found the ladies there to be very helpful and informative in regards to any questions I had.

As an exclusive benefit to my readers, please feel free to quote my name (Gina Faria) for an exclusive £25 off your first treatment! & 
If you wish to commit to a series of treatments they offer discounts when you book in bulk.

As always, thank you for stopping by and I hope you enjoyed the post! Until next time.


My Hydra Facial Experience at Premier Laser & Skin Clinic

I recently went for a facial at the premier laser and skin clinic in Notting hill, this particular facial intrigued me as it consisted of quite a few steps and seemed like a good 'fine-tuning' session for the skin.


I have oily skin which is prone to breakouts with visible pores and that feels a bit dull sometimes especially post breakout. So I was excited to go for a treatment that promised refined texture and tighter pores with no down time.


The Hydra Facial consists of 6 steps using a handheld tool with interchangeable vortex heads.

1. Detox - Lymphatic drainage (using large 'sucking' tool) is performed to help increase circulation and blood flow - this helps tone and firm the skin.

2. Cleansing and Exfoliation - Switching to a smaller attachment this gently exfoliates dead skin cells whilst a serum containing lactic acid, glucosamine, and botanical extracts are deposited onto the face.

3. Brightening Agent - A solution consisting of Glycolic & Salicylic acid helps loosen debris from the pores in preparation for the extraction phase and over time improves the texture of the skin. Salicylic acid is particularly useful for improving problematic skin. The concentration of the acids increases over time as your tolerance improves - up to a maximum of 30%

4. Extraction - Performed without the pain associated with traditional manual extractions. This stage helps remove black heads and draw out impurities using a mixture of salicylic acid and honey extract.

5. Hydration - This stage deposits a mixture of hyaluronic acid, antioxidants & peptides to replenish skin. Resulting in a fresh and plump appearance.

6. Rejuvenation - Red & Blue LED Lights. Red light helps stimulate collagen and accelerate healing so its benefits suit a wide variety of skin concerns particularly if you have skin that is inflamed & acneic. Blue helps to kill bacteria that can cause blemishes.

I was left astonished at how immediate the results were, a quick peek in the bathroom mirror before I left and the noticeable improvement in the texture of my skin and minimized pore size was undeniable. My skin wasn't red or irritated (i have previously had microdermabrasion before which left me red for hours post treatment as my skin is quite sensitive) it simply looked refined and refreshed - a HUGE thumbs up from me! 

If you are interested in booking I would highly recommend visiting the lovely people at premier laser and skin, they have various branches around London so there's bound to be a location suitable for everyone. 
I will link their website >here< Feel free to quote my name for an exclusive £25 your first treatment! If you wish to commit to a series of treatments (1 per month) they offer discounted yearly packages as well which are great value for money.

As always thank you for stopping by and I hope you enjoyed the post! Until next time.


Fresh Spring Look With Glossy Skin


With spring in full swing i was inspired to create this fresh dewy look with hints of peach and a focus on glowing skin.

Glossy Skin, Dewy Skin, Spring Make up

I recently came across an old sleek palette that i had in my palettes draw and thought that the rose gold and peach tones would work perfectly for this look. Adding shimmer and warmth to the eye, a combination that works perfectly for this season. 
To add that extra glimmer i added a sweep of MAC Studio eye gloss in Pearl Varnish for an ethereal feel.
I paired this up with Lancome Teint Miracle foundation as it has a gorgeous finish with just the right amount of coverage for a look like this.

To keep the skin fresh i left it un-powdered to retain that dewiness.

Sleek Makeup,Rodial Skincare,Lancome Cosmetics,Dr paw paw, MAC Cosmetics,

To prep the skin i started with MAC Peachlite strobe cream followed by the Lancome foundation. 

As i wanted to add definition to the face without it being too visible i opted for the cream contour palette by Sleek. The texture of this product is very smooth and blend able which when applied properly results in a gorgeous discreet sculpted look
I popped a touch of Lancome's My Parisian blush in corail de ville (sadly an old limited edition) on the apples of the cheeks and then added a touch of my trusty Dr.Paw Paw balm on the high points of the face to polish off the skin and give it that skincare glow.


Sleek Makeup,Rodial Skincare,Lancome Cosmetics,Dr paw paw, MAC Cosmetics,Sigma Brushes

To frame the eyes i used my NYX Cosmetics eyebrow cake powder palette in dark brown with an angled brush to define the brows, finishing them off with a slick of the control freak clear brow set.

Finally on the lips i loved rediscovering 'barely there' lipstick by Sleek. The texture is divinely creamy therefor doesn't highlight any texture on the lips.
It has the most gorgeous balance of coral & nude; suited to a lot of skin tones. (particularly medium - medium tan complexions) & at only £4.99 you cant go wrong.

Here is a link to the synthetic sigma brush set i used for the eye look - very important to me as i am allergic to natural hair, i also find that synthetic hair brushes are less prone to staining and easier to clean. 

Enjoy a 10 % Discount off the entire sigma website by using the code : GINAFARIA

As always thanks for popping by & i hope you liked the look,