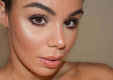
Reverse Liner Look

Today's post will be detailing the key products used to create the look i posted on Instagram today.


With polished dewy skin and a muted pink lip the focus was kept on the bright blue liner.

Sigma smokescreen palette, sigma brush kit, sigma indigobird liner, sigma E58, sigma E44, sigma E30

For the eyes i started with applying a thin layer of concealer to even out the tone of the lid. I then started by lining my waterline, lower lash line & then sketching out the liner design with the Indigobird liner, cleaning up when necessary with a small concealing brush dipped in makeup remover to achieve a crisp edge. 
I then blended the edges of the pencil with the E30 Pencil brush blending this into the Nebula shade from the Smokescreen palette to create a subtle gradient & add a touch of shimmer.

To complete the eyes and add that 'pièce de la résistance' i applied the Pearl Varnish Eye gloss by MAC with the E58 brush in long firm sweeping motions - application technique is key with a gloss to get a nice smooth appearance.

I have found a >Brush set< on the Sigma website that actually includes all of the brushes i used for this look which is super handy. The reason i love this brush set is that it is all synthetic hair - particularly important to me as i have an allergy to natural hair brushes. I also find them easier to clean and less prone to staining. Synthetic brushes are also suitable for liquid and cream product as well as powder unlike natural hair which is only suited to powder products.


Reverse Liner, Liner Looks, Blue Trend Eye Makeup, Eye Focus Makeup, Sigma Indigobird, Sigma Rosette Lip Eclipse, MAC Pearl Varnish, Eye gloss,


To highlight the skin i have started steering away from powder highlighters recently, opting for my new favourite product by MAC - Shine mixing medium. This product gives the skin a gorgeous healthy skincare sheen which looks a lot more natural than a powder highlight. 
Those with Dry or mature skin may prefer a product like this to a powder product that they may feel enhances any texture present on the skin.
The only place i lightly powdered was my under eye - which is essential to prevent concealer creasing.

I always like to keep my brows looking polished and defined, for this i enjoy using the eyebrow cake powder duo (in dark brown) by NYX Cosmetics to fine tune my shape using an angled brush, i then finish them off by applying their clear bow set using upward strokes to help add texture to the brows.

To add definition to the cheeks i opted for the cream contour palette by Sleek  (in medium) This product is not only easy to blend but because of its creamy texture it helps preserve the dewy appearance of the skin.

For the Lip i quickly lined my lips with Whirl lip liner by MAC and then patted on Rosette Lip Eclipse by Sigma - a gorgeous full coverage comfortable gloss.

As always i hope you liked the look but before you go i'll leave you with a discount code for the Sigma website in case you want to pick up any of the products used in this post :) please pop 'SIGMA2017' in the discount code box at the checkout to enjoy 10% off your purchase.


'Petrol Spill' Look

The inspiration for this look started with me playing around with a few items from the MAC Kabuki collection that came out not too long ago. The crystal glaze glosses in particular really caught my eye. 


Petrol Spill Lip Art, Galaxy Lip Art


I started by both lining & filling in the entire lip with Feline eye pencil, i then topped this with the 'overnight sensation' paint from the kabuki collection.

Next I layered the crystal glaze glosses in colours 'it's a great feeling' & 'ice follies' on opposite sides.

Ice follies has blue & pink reflective pigments that catch the light beautifully. 'It's a great feeling' is a red gloss with a warm orange pearl running through it; it creates a rich berry tone on top of the paint and black liner.


Petrol Spill Lip Art, Galaxy Lip Art


All of these colours work harmoniously and reminded me of the rainbow of colours you see in a petrol spill because of the way the glosses catch the light. 


mac feline, mac overnight sensation, mac its a great feeling, mac ice follies


Eyes


To keep the focal key the lips i decided to keep the eyes neutral with a touch of soft definition. To achieve this i used Rimmel magnif'eyes Pencil in 'Queens of a bronze age' I used the light shade all over the lid then the bronze shade as a soft liner by the lash line.

To amp up the look that bit further i added a generous amount of the ice follies gloss on top to get that gorgeous high shine.


Petrol Spill Lip Art, Galaxy Lip Art, Wet hair look, Edgy Makeup look, Glossy eye makeup.


Complexion


To keep the skin fresh i used a MAC face & Body water based foundation to give a beautiful glow to the skin. I team this up with their pro long wear concealer to boost coverage in problematic / oily areas, keeping the cheeks glowing but t-zone matte for a controlled glow.

For the cheeks i just wanted to add a bit of warmth with minimal blush, to achieve this i used Sisley powder gel bronzer onto the perimeters of the face whilst paying the most attention to the cheekbones.

I always like to use powder shadows to shape my brows as i like a soft but defined look.For this particular look i used NYX Dark brown eyebrow palette along side their clear brow set to lock the brow hairs in place whilst adding texture.

Styling


Finally with a heavy focus on glossy skin, eyes and lips. I thought a wet hair look would compliment this the best giving it more of an edgy feel.


As always thank you for stopping by. I hope the look has inspired you to try something new! 


Diffused Colour Pop Look


This Post will be a product breakdown of a look i created on instagram a while ago.The Inspiration for this look stemmed from a few images i had seen at fashion week of graphic blocked liner looks on the eyes.


As i didn't want a strong visible outline to the eye makeup i concentrated on diffusing the edges of the application to create a softer effect.Products used are as follows:

Complexion


Prepped with Mac Cosmetics Peach Lite strobe cream, followed by the new foundation I'm trying at the moment Vichy Dermablend (A full coverage long lasting matt finish foundation). The strobe cream helps add a gorgeous radiance to this full coverage foundation so you still benefit from the fantastic coverage but with an added healthy sheen

As always i first correct my under eye circles with dermacolor concealer in DF2 (a peachy shade) i then follow this up with La Girl concealer in light ivory to conceal & brighten up the under eye area. I contour and add warmth to the cheekbones using the 'Beautiful Bronzeshade, i like to apply this straight from the applicator and blend in with a dense buffing style brush. 

The hollows of the cheeks are further defined with a shadow by Illamasqua called Heroine (a cool toned soft grey)


Eyes

i start by applying Illamasqua liquid metal cream shadow in superior all over the lid lower lash line and squared off in the inner corner of eye. 

Touches of a few shadows from the Smashbox cosmetics photo matte eyes mini palette in the crease & on the lower lash line. Haze (blue-grey) & rosehip (rose light neutral)
I applied MAC 'Golden olive' pigment topped with a touch of their gold glitter on the lid and centre of lower lash line. To highlight I've used Vanilla pigment on high points of face and inner corner of eye.

To complete the look i applied lashings of my trusty Maybelline lash sensational mascara.


Cheeks & Brows


A touch of Loreal true match blush in peach . To highlight the cheekbone's I've used a cream stick by Smashbox LaLights stick in 'Hollywood&Highlight' topped with MAC's Vanilla pigment.

Lips

Anastasia Beverly Hills lipgloss in 'Venom' dabbed on the lips to create a soft rose bitten stain effect to the lips.

Anastasia Beverly Hills dark brown eyebrow powder duo through the brows for definition, set in place with the clear brow gel.


As always thanks for stopping by & i hope you liked the look. 


Modern Christmas Look With A 60's Twist

Today's post will be a breakdown of a look i posted on my instagram a few days ago.

(created using the new MAC Christmas Nutcracker collection)


Complexion

As i really wanted to focus on creating a gorgeous ethereal looking skin i prepped with the new PeachLite strobe cream to add that extra oomph. I followed this up with the Mineralize moisture foundation - a gorgeous medium coverage foundation with a dewy finish. i used the highlighting pens in the complexion shades (medium plus) to conceal under the eyes and add a soft brightness under the eyes and peaks of cheekbones to compliment the highlight.


Cheeks were warmed up using the BB compact cream bronzer in the shade 'Refined Golden' , i applied this with a #159 duo fibre brush to give a soft & blended yet defined look to the cheekbones and perimeters of the face. 
For blusher i used the gorgeous 'Sweet Vision' a delicate peachy shade with a soft gold sheen. To highlight the cheekbones,nose and brow bone I mixed the new extra dimension highlighter in Show Gold mixed with the PeachLite strobe cream to create an intensified glow- this mixture creates a paste that i dabbed on with my fingers.


Eyes

As i wanted to keep the focus on the double winged liner i only applied a soft wash of colour (extra dimension eyeshadow in Smoky Mauve) to the lids using a #217 blending brush.
For the liner i used Prunella pencil eyeliner applied using a #266 angled brush to create a double winged shape to define the eyes & give a 60's feel to the look.

Lips


To finish off the look i applied the 'Prancin' Dancin' lip gloss from the nude lip gloss kit . Upon close inspection this lip gloss is a gorgeous soft neutral shade with flecks of gold and pink shimmer running through it that catches the light beautifully.


As always i hope you enjoyed the look & thank you for popping by.

Fresh Autumnal Look

Today's post will be a product breakdown of a look i posted on Instagram yesterday, focused around fresh highlighted skin and a statement two tone lip.


Key product breakdown of the look is listed below:

Complexion

Firstly i prepped my skin with the MAC Strobe cream in 'Peachlite'. The new colour extensions are gorgeous, i was really excited to try them especially as the original would come up a bit too ashy on tan-deeper skin tones.
I followed this up by using MAC Face & body foundation in the shade C4 mixed with a touch of prolong wear concealer in NC42 applied down the
t-zone for 'controlled glow'. As i have an oily skin type i have to mix in a matte finish concealer otherwise face & body on its own is a tad too shiny and wont last.


My concealer routine is as usual, first i corrected my dark circles with the dermacolor corrector in the shade DF2 and then apply my LA Girl concealer in light ivory. I also use the shade beautiful bronze to add colour to the perimeters of my face and blend out using a dense buffing brush.

I set my skin with my Dermacolor fixing powder, this is a finely milled loose setting powder that you can pick up from the Charles fox store in covent garden. It comes in a variety of lightly tinted shades and truly helps your make-up last the test of time. I apply this with my beauty blender firmly pressing it into the skin, for this particular look i avoided powdering the cheeks to maintain the dewy glow.

On the cheeks is the MAC Versicolour lipstain in 'Constant Craving' dabbed on as a blush. To highlight i used Smashbox La Lights stick in 'Hollywood & Highlight' .


Eyes

Firstly i prepped with a touch of the MAC Layin' low Paint pot blended all over my lids followed by a new pigment from the Christmas collection again by MAC called 'English Gilt'. Touches of a few shadows from the Smashbox Photo Matte Eyes palette in the crease & lower lash line for soft definition. (Grounded, desert & earthy)
To polish off the eyes i added lashings of my trusty Maybelline Lash sensational mascara.


Lips

For the lips i used MAC's Blue-Brown Pigment mixed with clear Lipglass to create a gorgeous two tone earthy autumnal shade. This colour reflects either brown or greeny/blue dependant on the light. I thought this created the most gorgeous unique lipstick that commands all the attention in this look.


I hope you like the look and enjoyed this post. As always thank you for stopping by, until next time.


Softly Defined - Sisley Makeup

Today's post will be a product breakdown on a look created with some new goodies by Sisley.


With a fantastically luxurious lineup of products i was super excited to get stuck in . Listed bellow are the products used to create this look 


Complexion

On the skin i have applied the anti ageing liquid foundation . This is a sheer buildable foundation with a satin/glow finish. For reference my shade is 4.B Chestnut
 (The B range has more of a golden undertone whilst their R range is more rosy) 

For concealer, i first corrected my dark circles with my usual dermacolor corrector in the shade DF2 and then applied the Phyto cernes éclat concealer in the shade - 4. - This concealer has a medium coverage & natural matt finish.
I applied this with a precision brush and then blended in using a beauty blender with patting motions to maintain coverage in the target area.

I set the skin with the Phyto-Poudre Libre (Loose Face Powder) in - 2 Mate. This powder comes with a lovely little puff. I first decanted this into the palm of my hand and then applyed with the puff using a firm press and roll motion.

To dress the skin up i applied the Phyto-Touche Sun Glow bronzing gel powder on the perimeters of the face. This bronzer is a soft highlighter* and bronzer in one, giving a beautiful ethereal finish to the skin.
*(very fine sheen)

Brows

Phyto-Sourcils Perfect eyebrow pencil - Chatain. I applied this through the sparse areas of the brow paying particular attention to the arch to give definition and lift to the eye.

Eyes

Phyto Eye Twist in shade 11 (Bronze shade) applied to both the upper and lower lash lines, diffused using a pencil brush. I added extra depth with the Eye Kohl in Brown to the very base of the lashes, extending the outer corner of the eye into a soft wing. I like to clean up the bottom of the wing with a flat precision brush using a minimal amount of concealer to achieve a clean edge.

For the lashes i used the benefit eye primer and then topped this with maybelline Falsies push up drama Mascara.


Lips

On the lips i kept it simple by lining the lips with the nude lip liner and topping this with the Phyto Lip twist - 16  which is a soft balm. Softly diluting the colour of the liner but maintaining a polished look.

 I hope you liked the look and enjoyed this post. As always thank you for stopping by, until next time.


My Experience With Nexplanon

Hi Guys,

So today will be a kind of off topic/non beauty related subject, but i felt i should write about it as a lot of you showed interest towards it via my Facebook & Instagram.
I am going to write about my personal experience with the implant. This is my second now, i had it replaced about 3 weeks ago so took the opportunity to take some pictures of my healing process & explain a bit about how it works!


First off for those of you who aren't aware of what Nexplanon is you can check out their website >Here< , there's also a lot of info about it on it on the >Net Doctor Website < but i'll just quickly give you a brief description. 


It is a small flexible rod,about the same shape and size as a match stick,placed in your (non dominant) arm just under the skin.It provides a long-term reversible method of contraception that steadily releases hormones over the course of 3 years.

It works by preventing an egg from developing & also thins the lining of the womb making it hard for a fertilised egg to attach itself, it also makes entry harder for sperm by thickening the mucus at the entrance of the womb. 

It is the most effective form of contraception to date with the lowest failure rate across all forms of contraception, mainly due to the fact that it doesn't require you to do anything, theres no remembering to take a pill every morning or applying a patch or worrying about it shifting or falling out of place in the case of some of the contraceptives inserted vaginally.You simply have it inserted into your arm and forget about it for the next 3 years.

Insertion & First Impression
The implants come individually packed & preloaded into a needle.
My first implant (implanon) was inserted back in 2010, the procedure was relatively painless.I couldn't feel the insertion at all as my arm was numbed, the only thing that hurt ironically was the injection of anaesthetic! 

Bruising was minimal, a small plaster was all that was needed & scaring was minimal as well. However the first few months que'd irregular spotting. I had no normal periods it was just random small amounts through out the first 3 months or so. This was highly irritating but manageable. I visited a doctor to see if there was anything i could take to help she simply said to wait it out until my body got used to the implant..which it did, everything eventually returned to normal.
However sometimes i would randomly skip a month or 2 and not get a period at all so it really depends , it will effect different women in different ways, apparently some women dont even get a period at all! ..lucky.

On my Nexplanon i am experiencing similar problems after insertion, i am assuming this is because i have a new implant so my body is receiving the highest dosage again. I did a bit of online research and popped into my local holland and barret to see if there was anything i could take to help.A lovely lady there who is also using a hormone based contraceptive recommended i take primrose oil tablets to help regulate my period.I am slowly but surely noticing an improvement which is great, I am also taking a multivitamin as i have always had prolonged periods (even before the implant) to help with fatigue as having long periods can really leave you feeling drained, i never realised there could be a correlation until i did my research and found other women were having the same problem so if your body reacts to the implant with prolonged periods be sure to keep your iron and vitamin levels up with a supplement to avoid feeling drained.I was heavily reliant on caffeine until i understood what the actual root of the problem was.

Replacement
A small surgical procedure is needed to remove the implant & by small..i mean tiny. I laid down with my arm out, was injected with anaesthetic; the doctor made a small incision and the implant was pulled out with forceps. The implant was then replaced in the same spot in the same way the first one was inserted. I now have a nexplanon as i believe it has replaced implanon as it is xrayable which the implanon was not, this makes the detection of the implant easier.

Here are some pictures of my healing process. The replacement resulted in quite a bit of bruising. I am assuming this is because of the removal of the initial implant in addition to inserting the new one, i also bruise very easily.
I know it looks scary but it has healed nicely,the second scar is actually less visible then the first & is yet to fade even more.

Looking less scary now!...


Conclusion
I have had no problems with its effectiveness at all, so i cant recommend it highly enough. To me, the pro's substantially outweigh the cons.The problems with my period pretty much returned to normal after a while & i had no other complications after that.

If for any reason the implant really doesn't agree with you it can easily be removed and your fertility & everything else will return to normal shortly (hence the reversible statement at the start of the post)

If you are interested in having one fitted simply pop down to your GP or a local sexual health clinic and request a consultation & appointment. I had mine fitted at a Brook Clinic (Click for their website) I would recommend phoning the clinic first before you pop in as the implant doctors are only in on specific days!

I hope you enjoyed the post as always, comment below if you have any further questions, im more than happy to answer :-)